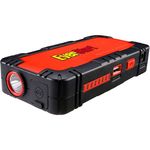
EverStart MULTI-FUNCTION JUMP STARTER Manual

This device complies with part 15 of the FCC rules. Operation is subject to the following two conditions: (1) this device may not cause harmful interference, and (2) this device must accept any interference received, including interference that may cause undesired operation.
This equipment has been tested and found to comply with the limits for a Class B digital device, pursuant to part 15 of the FCC Rules. These limits are designed to provide reasonable protection against harmful interference in a residential installation. This equipment generates, uses and can radiate radio frequency energy and, if not installed and used in accordance with the instructions, may cause harmful interference to radio communications. However, there is no guarantee that interference will not occur in a particular installation. If equipment does cause harmful interference to radio or television reception, which can be determined by turning the equipment off and on, the user is encouraged to try to correct the interference by one or more of the following measures:
- Reorient or relocate the receiving antenna.
- Increase the separation between equipment and receiver.
- Connect the equipment into an outlet on a circuit different from that to which the receiver is connected.
- Consult the dealer or an experienced radio/TV technician for help.
Changes or modifications not approved by the party responsible for compliance could void user's authority to operate the equipment.
IMPORTANT SAFETY INSTRUCTIONS
RED ALL INSTRUCTIONS
:
Read all instructions before operating the jump starter. Failure to follow all instructions listed below may result in electric shock, fire and/or serious injury.
WARNINGS AND INSTRUCTIONS
- Avoid dangerous environments. Don't use appliances in damp or wet locations. Don't use appliances in the rain.
- Keep children away. All visitors should be kept at a distance from work area.
- Store idle appliance indoors. When not in use, appliances should be stored indoors in dry, and high or locked-up place-out of reach of children.
- Never carry appliance by cord or yank it to disconnect receptacle. Keep cord away from heat, oil, sharp edges and other abuse.
- Disconnect the appliance from the power supply when not in use, before servicing, and when changing accessories.
- Use of accessories and attachments. The use of any accessory or attachment not recommended for use with this appliance could be hazardous.
- Stay alert, and do not operate appliance if you are tired or impaired.
- Do not operate this appliance near flammable liquids or in gaseous or explosive atmospheres.
- Never submerge this unit or the AC charging adapter in water; do not expose this unit or the AC charging adapter to rain, snow or use when wet.
- To reduce risk of electric shock. Disconnect the unit from any power source before cleaning.
Turning off controls without disconnecting will not reduce this risk.
SAFETY INSTRUCTIONS FOR CHARGING THIS UNIT
- :
This unit is delivered in a partially charged state. Fully charge the unit with the supplied AC charging adapter for a full 6 hours (or until the unit shows as fully charged) before using for the first time.
- The recommended method for recharging this unit is using the AC charging adapter. When using this method, only use the AC charging adapter supplied with the unit. Plug in the charging adapter at the jump starter first, then plug into the charging source.
- After charging/recharging, disconnect charging adapter and wait 5 minutes before use.
- Do not crush, cut, pull or expose charging adapter cords to extreme heat.
- Position charging adapter cords so they do not become entangled or become a safety hazard. Keep charging adapter cords away from sharp edges.
- Use in a dry location only.
- Do not attempt to charge the unit if the charger is damaged.
:
TO REDUCE THE RISK OF INJURY OR PROPERTY DAMAGE:
Disconnect Adapter by pulling the plug rather than the cord when disconnecting the Charging Adapter.
SAFETY INSTRUCTIONS FOR LITHIUM BATTERIES
:
TO REDUCE THE RISK OF FIRE, ELECTRIC SHOCK, BURST HAZARD, OR INJURY TO PERSONS OR PROPERTY:
Lithium batteries are small, compact and ideal for providing long-lasting power to this unit. However, they must be used and charged properly. Improper use can result in serious injury, fire, or death.
- Lithium batteries can explode in the presence of a source of ignition. Do not use the product in the presence of an open flame
- Do not place this lithium battery powered unit in fire or apply heat to it
- Do not subject this lithium battery powered unit to strong impacts or shocks. The battery in this unit contains safety and protection devices which, if damaged, may cause the battery to generate heat, rupture or ignite
- Do not expose this lithium battery powered unit to water or salt water, or allow the battery to get wet
- Avoid storing this lithium battery powered unit in the basement, bathroom or other areas of the house that are or may become wet or humid or where moisture may concentrate.
- Do not leave this lithium battery powered unit in direct sunlight, or use or store the unit inside cars in hot weather. Doing so may cause the battery to generate heat, rupture, or ignite. Using the battery in this manner may also result in a loss of performance and a shortened life expectancy.
- Never charge this unit near heat or flammable objects.
- NEVER THROW WATER ON A BURNING LITHIUM BATTERY! If a lithium battery does catch on fire, it will burn even more violently if it comes in contact with water or even moisture in the air. A Class D fire extinguisher must be used.
Battery Charging and Capacity
This unit is delivered in a partially charged state. You should charge it for 4-6 hours before first use.
When stored at room temperature with a full charge, Lithium batteries will begin to discharge from the time they are manufactured, even when unused. Deep discharges also decrease their capacity. Battery life can be extended by the following:
- Charge battery to full capacity before storage
- Ideal storage temperatures for this unit range between 41°F and 68°F (5°C and 20°C).
- Never discharge the battery fully.
- Charge after each use.
- Always charge at least every 3-6 months to prevent over discharge.
Transportation of Lithium-Ion Batteries
- Always check all applicable local, national, and international regulations before transporting a unit containing a lithium-ion battery.
- Transporting an end-of-life, damaged, or recalled battery may, in certain cases, be specifically limited or prohibited.
SAFETY INSTRUCTIONS FOR JUMP STARTER
:
RISK OF EXPLOSIVE GASES
Working in the vicinity of a lead acid battery is dangerous. Batteries generate explosive gases during normal battery operation. For this reason, it is of the utmost importance that each time before using the jump-starter you read this manual and follow instructions exactly.
:
TO REDUCE THE RISK OF INJURY OR PROPERTY DAMAGE:
- NEVER ATTEMPT TO BOOST OR CHARGE A FROZEN BATTERY.
- When working with lead acid batteries, always make sure immediate assistance is available in case of accident or emergency.
- Never smoke or allow a spark or flame in vicinity of vehicle battery, engine or jump starter.
- Remove personal metal items such as rings, bracelets, necklaces and watches when working with a lead acid battery. A lead acid battery can produce a short circuit current high enough to weld a ring, or similar metal object, to skin, causing a severe burn.
- Do not operate unit with damaged cord or plug; or if the unit has received a sharp blow, been dropped, or otherwise damaged in any way. Do not disassemble the unit, opening the unit may result in a risk of electric shock or fire.
- Do not leave the unit unattended while in use.
- This unit is not for use by children or infirm persons.
- Disconnect adapter by pulling the plug rather than the cord when disconnecting the AC charging adapter.
SAVE THESE INSTRUCTIONS
- The jump starter is designed for use on small to mid-sized vehicle batteries ( 6 cylinder or smaller).
- Several factors can affect the jump starter's ability start the vehicle, including, but not limited to the size of the vehicle battery, the temperature(hot or cold), whether the battery is damaged or defective, and whether the jump starter itself has sufficient power.
- Before starting the vehicle, be sure all vehicle accessories(i.e. Heater, fan, radio, TV, lights, etc.) are turned off.
POWER STATUS INDICATOR LIGHTS
Before using the unit, checking the power status whether itself has sufficient power.
Press the power button, the LED power indicator turn light. Refer to below features:
| LED | Power status |
2 red LEDs
 | 25% |
4 red LEDs
 | 50% |
4 red LEDs+2 blue LEDs
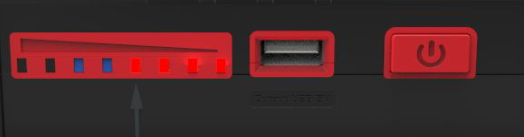 | 75% |
4 red LEDs+4 blue LEDs
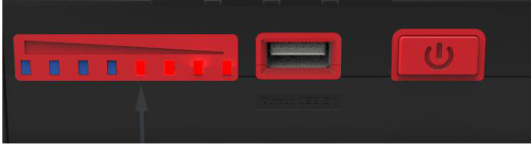 | 100% |
All batteries lose energy from self-discharge over time and more rapidly at higher temperatures.
Recharge the unit every 3-6 months if not in use, or when the power is insufficient.
CHARGING/RECHARGING THE UNIT
Lithium batteries require routine maintenance to ensure a full charge and long battery life. All batteries lose energy from self-discharge over time and more rapidly when they are at higher temperatures. Therefore, batteries need periodic charging to replace energy lost through self-discharge, and should be recharged every 3-6 months.
The unit have the overcharge and overload protection to prevent the explosion, and protect the battery.
Notes:
This unit is delivered in a partially charged state, you must fully charge it after purchase and before using it for the first time. Initial AC charge should be for up to 4-6 hours or until the unit shows as fully charged (the unit's LED power indicator light solid: 4 LEDs are solid blue and another 4 LEDs are solid red).
Recharging battery after each use will prolong battery life; frequent heavy discharges between recharges will reduce battery life. The battery should be recharged using the supplied AC charging adapter.
USING THE AC CHARGING ADAPTER (RECOMMENDED)
- Insert the barrel connector of the supplied AC charging adapter into the unit's charging port.
- Insert the plug end into an AC outlet.
- The unit's LED power indicator lights will roll to indicate the unit is in charging mode.
Note: If the LED power indicator does not come on, check the connection to the AC power source.
- Charge the unit until the LED power indicator changes from flash to solid(4 LEDs are solid blue and another 4 LEDs are solid red). It will last 4-6 hours.
- When charging is complete, first unplug the AC charging adapter from the power source, and disconnect the barrel connector of the AC charging adapter from the unit. Store the adapter in a safe place.
USING THE 12V DC CHARGER
:
TO AVOID THE RISK OF PROPERTY DAMAGE:
Recharge using this method only when necessary. Do not leave the unit unattended when charging using 12V DC charger.
- Insert the barrel connector of the 12V DC charger into the unit's charging port.
- Insert the charger into the vehicle's 12 volt DC accessory outlet.
- The unit's LED power indicator lights will roll to indicate the unit is in charging mode.
- Charge the unit until the LED power indicator changes from flash to solid(4 LEDs are solid blue and another 4 LEDs are solid red). It will take approximately 6 hours to charge from empty.
- When charging is complete, first unplug the charger from the vehicle's 12 volt DC accessory outlet. Then disconnect the barrel tip of the 12V DC charger from the charging port. Store the adapter in a safe place.
OPERATING INSTRUCTIONS
JUMP START YOUR CAR IMPORTANT
Notes:
- The jump starter is designed for use on small to mid-sized vehicle batteries ( 6 cylinder engine or smaller).
- Several factors can affect the jump starter's ability start the vehicle, including, but not limited to the size of the vehicle battery, the temperature(hot or cold), whether the battery is damaged or defective, and whether the jump starter itself has sufficient power.
- Before starting the vehicle, be sure all vehicle accessories(i.e. Heater, fan, radio, TV, lights, etc.) are turned off.
START VEHICLE
Note: Before attempting to start 12V vehicle, make sure the jump starter itself has sufficient power. Manufacturer recommends the battery be fully charged, 4 LEDs are solid blue and another 4 LEDs are solid red.(or 4 LEDs are solid red and at least 1 LED is solid blue).
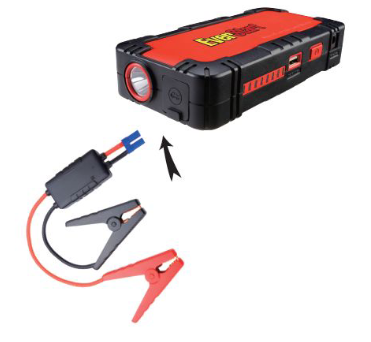
- Plug the blue clamp cable plug firmly into the jump starter port until it beeps for half a second and the clamp LED indicator turns red.
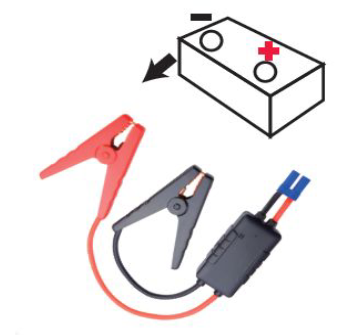
- Connect the clamps to the vehicle battery. The BLACK clamp to the negative (-) terminal of the car battery first, the RED clamp to the positive (+) terminal second, make sure they have a good connection, the LED indicator of the clamp will light green.
CAUTION: REVERSING THE CONNECTIONS MAY RESULT IN DAMAGE TO THE JUMP STARTER, OR PERSONAL INJURY.
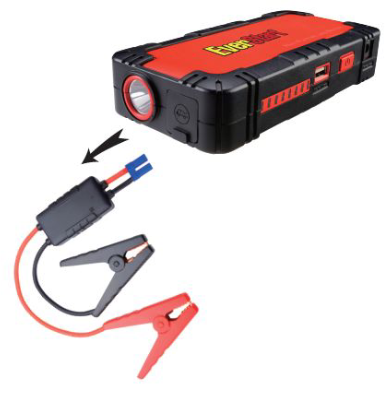
- Start the vehicle. Once started, unplug the blue connector from the Jump Starter, then remove the battery clamps.(If the temperature is below 32°F (0°C), please allow a few minutes before starting the vehicle.)
- Always connect the BLACK clamp to the negative (-) terminal of the car battery first, then connect the RED clamp to the positive (+) terminal of the car battery. Do not touch the RED and BLACK cable clamps each other, or connect both clamps to the same piece of metal. If connections are reversed or there is a short circuit, the LED indicator of the clamp will turn red, and the alarm will beep. Quickly remove the clamp cable's blue plug from the jump starter, then disconnect the clamps from the car battery.
- If the vehicle does not start after the first attempt, allow 30-60 seconds between attempts. If Jump Starter becomes warm, disconnect Jump Starter from the cables and allow to cool before reattempting to start the vehicle.
- After successfully starting the vehicle, always remove the clamp cable's blue plug from the jump starter first, then disconnect the clamps from the car battery terminals.
- When the LED indicator of the clamps is green, DO NOT disconnect the clamps from the car battery terminals before removing the clamp cable's blue plug from the jump starter.
DIAGRAM:
- Red clamp connect "+", Black clamp connect "-"
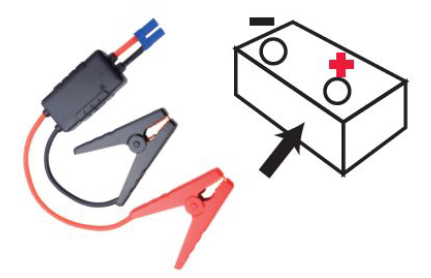
- connecting the jump cable to the jump starter
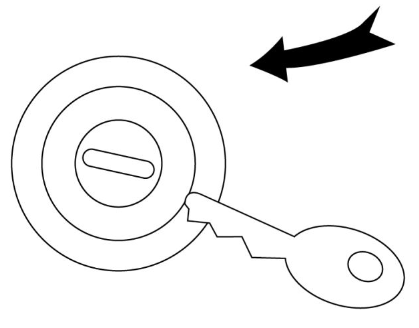
- Start the vehicle
- Disconnect the jump cable from Jump starter first
- Remove the clamps from the battery
USING THE USB PORT
- Make sure the AC charging adapter and 12V DC charger is disconnected.
- Plug the USB-powered device into the USB port.
- Press the power button one time to turn the power on. The LED power indicator turn light to indicate the unit's internal battery status.
- The LED power indicator will turn off after 5 seconds, while the USB output continues.
- After charging is complete, disconnect the device from the USB port. Power to the USB port will turn off automatically after 30 seconds.
USING LED FLASH LIGHT
- Press the power button to turn the unit on.
- Press again to change between light & flash.
- Double press the power button quickly to turn off the light.
NOTE: Do not look directly at the light to avoid eye injury.
CARE AND MAINTENANCE
All batteries lose energy from self-discharge over time and more rapidly at higher temperatures. When the unit is not in use, we recommend that the battery is charged at least every three months.
Ideal storage temperatures for this unit range between 41°F and 68°F (5°C and 20°C) to maximize battery life.
Never submerge the unit in water. If the unit gets dirty, gently clean the outer surfaces of the unit with a soft cloth moistened with a mild solution of water and detergent.
Store the units and accessories in safe and dry place, DO NOT PLACE THE UNIT IN DIRECT SUNLIGHT IN THE VEHICLE,IT WILL BE DAMAGED IN THE HIGH TEMPERATURE.
There are no user-replaceable parts, periodically inspect the condition of unit, adapters and wires. Do not use any components that have become worn or broken.
ONE-YEAR LIMITED WARRANTY
Walmart guarantees this product to the original purchaser for a period of ONE YEAR against any defects in material and workmanship, but shall not cover damage caused by misuse, abuse, alteration, accident, and failure to follow instructions for care and maintenance for the product.
SPECIFICATION:
| Input: | DC 15V, 1A(AC charger)
DC 12V, 2A(Car charger) |
| Output: | DC 12V 200A Peak current: 400A |
| Battery Type: | Lithium battery, 3.7V 12000mAH |
| USB: | DC 5V,2A |
This product contains an internal Lithium battery pack for formulated from environmentally sensitive materials. This product must be disposed of properly with due care for the environment. Please return this product to your to your local recycling station where batteries will be recycled or properly disposed.

Toll-free number: 800-234-3702
Documents / Resources
Download manual
Here you can download full pdf version of manual, it may contain additional safety instructions, warranty information, FCC rules, etc.
